
Lewisburg.
The New York Times gives a nod to some of Wisconsin's finest cheesemakers, many of whom I can wholeheartedly support: Fantôme; Bleu Mont; Hook's; Dreamfarm; Uplands; Carr Valley. The last of which is mentioned in conjunction with their "Cocoa Cardona" cheese, a fine example of the new Wisconsin artisanal cheese world that happens to be in our refrigerator. (It's available at Wegman's sometimes - so is the Uplands Pleasant Ridge Reserve, among others.) So, to those who can still buy these phenomenal cheeses on a weekly basis, do know that I'm jealous.
30 March 2008
27 March 2008
Baking Class - Cookies.
Lewisburg.
Sharon asked me, as I was headed out the door to teach my students how to make chocolate chip cookies, if I thought we'd even make it past the cookie dough stage. I'm pleased to say that we did make quite a number of cookies, though at least one student went home feeling woogy from eating too much dough. Here're the baked results:
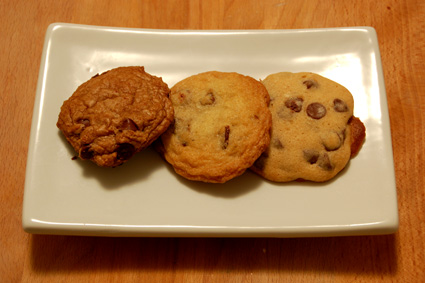
Those are all student-baked cookies, in their chewy, crispy, and cakey variations (left to right). Granted, they do seem to have a little trouble with reading and following simple directions1, but everything still worked out pretty well. Especially when I'm leaning over shoulders so that I can call things to a quick halt if necessary. In the next series of classes, it looks like I'll need to spend some time discussing how one is actually supposed to read a recipe.
1Sharon confirms that this is often the case in math classes, too.
Sharon asked me, as I was headed out the door to teach my students how to make chocolate chip cookies, if I thought we'd even make it past the cookie dough stage. I'm pleased to say that we did make quite a number of cookies, though at least one student went home feeling woogy from eating too much dough. Here're the baked results:
Those are all student-baked cookies, in their chewy, crispy, and cakey variations (left to right). Granted, they do seem to have a little trouble with reading and following simple directions1, but everything still worked out pretty well. Especially when I'm leaning over shoulders so that I can call things to a quick halt if necessary. In the next series of classes, it looks like I'll need to spend some time discussing how one is actually supposed to read a recipe.
COOKIES* * * * *
Baking 101 – Spring 2008
ABOUT DROP COOKIES
Although there are many, many different kinds of cookies, drop cookies are some of the most common ones in America. Usual examples include oatmeal raisin cookies and the ever-popular chocolate chip cookies. Like almost all cookies, they contain significant amounts of fat and sugar in proportion to flour, which make for a distinctive rich and sweet flavor. Beyond that, however, a range of ingredients and mixing techniques can produce cookies with a great diversity of textures. Drop cookies constitute a group – one with a wide range of flavors and textures in it – made from a soft dough that is scooped onto a baking sheet by the spoonful. During baking, these round balls of dough spread out into the characteristic cookie shape.
THE CREAMING METHOD
Creaming is essential to making a good drop cookie. Unlike in yeast breads, where the kneading process develops lots of tiny air pockets to be filled with expanding leavening gases, cookies need to have air bubbles worked inside without creating gluten. This process, called creaming, mixes the cooking fat, usually butter, with sugar; as the two are mixed, the rough edges of the sugar crystals tear tiny holes into the fat. As these holes seal over, they trap in tiny bubbles of air. You can see the effect of this as the volume of the sugar/fat mixture expands by up to a third and the color of it lightens. During baking, these pockets expand, raising the cookies and giving them their characteristic lightness.
Creaming can be done by hand, or with an electric mixer. If creaming by hand, always be sure that the butter is fully softened before working it; softened butter is at the stage, about room temperature, where it is soft and malleable without melting. Electric stand mixers work best, and can effectively cream even cold butter, although they’re quite expensive. An electric hand mixer doesn’t do the best job, due to the shape of the thin metal beaters, but is a fair compromise between cost and arm power.
DROP COOKIE VARIATIONS
Drop cookies are easy to make, and easy to adjust to your particular taste. Here are a few ways to modify the basic chocolate chip recipe below to get different final results:TYPES OF COOKIES
- Flour. Cake flour can hold less moisture than all-purpose, which leaves more of the water in the recipe available for steam; hence, cake flour produces puffier, cakier cookies. Bread flour is more likely to produce gluten, and so will make chewier cookies. It also holds on to more moisture, resulting in a slightly moister cookie.
- Sugar. White sugar, for various reasons, helps cookies to spread while baking, and produces a crispier cookie once cooled. Brown sugar, due to the presence of molasses, holds on to much more moisture, resulting in a moister, chewier cookie. By tipping the ratio of white to brown sugar in one direction or the other, you can change the final cookie texture.
- Fat. Butter has a relatively low melting point, which allows cookies more time to spread before setting during baking, making for flatter, crispier cookies. Margarine and shortening melt at higher temperatures, allowing more time for the cookie to rise, and less to spread, producing cakier cookies. Melting the butter before mixing with the sugar will produce very few bubbles during creaming, making for a denser, chewier cookie.
- Leavening. Baking soda raises the pH of the dough, resulting in a higher set temperature during baking; this gives the cookies more time to spread. Increasing the quantity of baking soda by up to fifty percent will make for crispier cookies. Baking powder, on the other hand, doesn’t affect the pH of the dough, which allows for a lower set temperature. This, combined with its extra leavening power, causes cookies to rise more, producing a cakier texture. Replace the baking soda one-for-one with baking powder for this effect.
- Eggs. Eggs tend to produce puffiness in baked goods, so replacing one egg with ¼ cup of milk will make for a flatter, crispier cookie. Egg whites also tend to dry out baked goods, so replacing one egg white – while keeping the yolk – with 2 Tablespoons of milk will make for a chewier cookie.
- Other ingredients. Chocolate chips can be replaced with nuts, raisins, or anything else that happens to sound good. Likewise, the vanilla can be replaced with an equal quantity of another extract, spirit, or liqueur; the use of orange extract, bourbon, or even strong coffee can add a subtle but interesting variation to the usual chocolate chip cookie flavor. Finally, it’s simple and easy to add ground spices to the dry ingredients to change the flavor. Anything that goes with chocolate, from cinnamon to chilli peppers, works well.
- Temperature. Cold dough will spread less in the oven, as the exterior sets quicker compared to the center of the cookie. For a cakier cookie, place the mixed cookie dough in the refrigerator to cool before baking.
There is a near-endless variety of cookie recipes available, with many, many different ways of preparing them. American cookies tend to fall into five basic categories:
- Drop cookies. Chocolate chip and oatmeal cookies, among others. These are made from a soft dough that is scooped onto a baking sheet by the spoonful.
- Cut-out cookies. Sugar cookies and butter cookies. Made from a stiffer dough than drop cookies, which allows it to hold shape while baking, these are rolled out and cut into shapes with cookie cutters.
- Hand-shaped cookies. Ladyfingers and madeleines. These are made from batters that are stiffened by chilling, then piped or molded into shape before baking.
- Bar cookies. Brownies and nut bars. These cookies are shaped after baking, when cut from a pan. They are baked from a batter spread in a shallow pan, and have a cake-like quality.
- Icebox cookies. These cookies are pre-formed into cylinders, often wrapped in parchment or wax paper, and kept in the refrigerator or freezer. Cross-section slices can then be cut and baked as needed; many cookie doughs can be treated this way.
CHOCOLATE CHIP COOKIES
Adapted from the classic Nestle Toll House recipe
Makes five dozen cookies
INGREDIENTSDIRECTIONS
- 2 ¼ cups all-purpose flour
- 1 teaspoon baking soda
- 1 teaspoon salt
- 1 cup butter, softened
- ¾ cup granulated sugar
- ¾ cup packed brown sugar
- 1-½ teaspoons vanilla extract
- 2 large eggs
- 1 12-ounce package chocolate chips
NOTES
- Preheat the oven to 375° F. Cream together the butter and sugars in a large bowl, until the mixture has increased in volume and lightened in color. Add the eggs, one at a time, incorporating each fully before adding the next. Add the vanilla.
- Combine the flour, baking soda and salt in small bowl. Mix into the butter mixture in three parts, making sure each is fully incorporated before adding the next. Stir in the chocolate chips. Drop rounded tablespoonfuls onto ungreased baking sheets.
- Bake for 9 to 11 minutes or until golden brown; when the edges start to brown, but the cookie is still slightly soft in the center, they’re done. Cool on baking sheets for a moment to firm a bit before removing to wire racks to cool completely.
- When spooning out cookies onto baking sheets, make sure that all of the scoops are the same size to ensure all the cookies finish at the same time. If possible, use a disher scoop to be sure. Larger and smaller cookies will bake up just fine; adjust the cooking time appropriately.
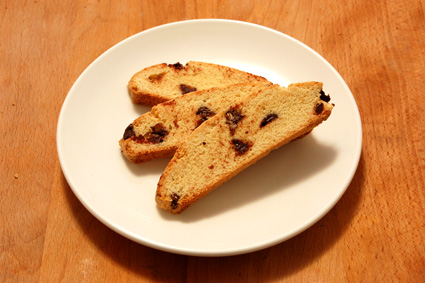
CHOCOLATE CHIP BISCOTTI
Adapted from How To Cook Everything
Makes fifteen to twenty biscotti
INGREDIENTSDIRECTIONS
- 2 Tablespoons unsalted butter, softened, plus more for greasing baking sheets
- ¼ cup plus 2 Tablespoons granulated sugar
- 1 large egg
- ¼ teaspoon vanilla extract
- 1 cup plus 2 Tablespoons all-purpose flour, plus more for dusting baking sheets
- 1 teaspoon baking powder
- Pinch salt
- ¼ cup chocolate chips
NOTES
- Preheat the oven to 375° F. Cream together the butter and sugar in a large bowl, until the mixture has increased in volume and lightened in color. Add the egg and vanilla, stirring until fully incorporated.
- Combine the flour, baking powder, and salt in small bowl. Mix into the butter mixture in three parts, making sure each is fully incorporated before adding the next. Stir in the chocolate chips.
- Butter a baking sheet and dust with flour; turn it over and tap gently to remove any excess. Shape the dough into a log approximately 3 to 4 inches wide, and about an inch thick. Place onto the baking sheet and bake for about 30 minutes, or until it is golden and beginning to crack.
- Remove from the oven, and lower the temperature to 250° F. Allow the loaf to cool until easy to handle, and cut along the diagonal into ½-inch slices with a serrated knife. Place the slices back on the baking sheet and return to the oven to dry, about 15 to 20 minutes, turning once. Cool on a wire rack.
- Not all biscotti recipes call for butter; here, it helps to tenderize them. Butterless (or other low-fat) biscotti recipes are quite crunchy, and often need to be dunked in coffee to be eaten.
- A single cookie is called a biscotto. Biscotti is plural.
1Sharon confirms that this is often the case in math classes, too.
24 March 2008
Cookies? For breakfast?
Lewisburg.
The idea of having cookies for breakfast is definitely an appealing one. Unless it's Cookie Crisp, which is creepy for a variety of reasons. Perhaps most for the box cover on Wikipedia that announces "Artificial Chocolate Chip Flavor" as though it were a selling point, though a more current version that attempts to sell this stuff as a good source of whole grains1 is certainly more sinister. But that's not what I'm after.
I mean biscotti, of course. Those cookies that require an accompanying cup of coffee2 - dunking being the thing - are somehow okay, even though a plate of chocolate chip cookies at the breakfast table is just the other side of that line of acceptability. It does make me wonder.
It's hard not to call them cookies. Enough so that I'll be teaching my students to make them in class on Wednesday, during our "Cookies" class. They said they wanted to do more than just chocolate chip cookies, so I'll accommodate.3 The recipe should be up here in a few days.
* * * * *
1Who's falling for that one, honestly?
2Not my cup of tea, but a glass of milk would certainly do, too. Tea, on the other hand... okay alongside with, but dunking just doesn't seem right.
3What I'm interested to see is how they respond to cookie-making. Most, if not all of the students have made chocolate chip cookies before, and I've no doubt it's the usual Toll House recipe. Which I'm using. But I'm not letting any of them follow the recipe as it's written, because I want them to learn to modify it. So... we'll see.
21 March 2008
Is it Spring yet?
Lewisburg.
My plate has been rather full of late. And everything, it seems, is food-related these days.
It's been about two months' worth of shuffling things about, but we now have a local Slow Food convivium - Slow Food Susquehanna River Valleys. It's a long and clumsy name, I know, but it's the best compromise we could reach with the head office in New York.1 This, of course, means lots of paperwork to get it all set up, from the Employer Identification Number to the 501(c)3 non-profit status. It's not hard, really. It's just a lot of IRS fine print and more work for our little printer than it's seen since we moved here.
The major upside of this, as far as I'm concerned, is that I get to do neat food-related stuff that I wouldn't get to all by myself. Example: a tour of the Selin's Grove Brewing Company. It's a very small brewery, which means it was pretty much like touring the world's most amazing homebrew setup. Sure, all of the equipment was enormous, but it was all set up inside a renovated garage, and I knew exactly how each step worked. Plus, Steve has to do just about all of it by hand, which sounds rather familiar.
The tour finished up with a tasting of seven of the beers on tap. I can't remember all of them now, but even in those little glasses it was a hell of lot of beer for a Sunday lunch. I'm not saying I'd want to do it very weekend, but it was a grand time.
Then there's the baking class, which I've already mentioned. And the garden planning, which is going full-tilt in preparation for the first seeds to hit soil in just over a week. Or maybe this afternoon, since I forgot to add the herbs into the spreadsheet. Granted, I'm still scratching my head a bit over the last little bits - particularly the lettuce and other greens - but I'm sure it'll work out. I'm sure I'll be giving away and/or composting a wide variety of excess produce, and hopefully taking enough notes to fine-tune it all a bit for next year.
And, coming up soon, I'll be managing our local growers' market. At least that doesn't start until May...
* * * * *
1This after I had to make an impassioned plea to keep the word "Susquehanna" in our name. Lose that geographic descriptor, and folks 'round here won't claim to have anything else in common.
20 March 2008
Baking Class - Biscuits & Scones.
Lewisburg.
I love biscuits. Probably because they're like butter made crispy and flaky, but I see no reason to hold that against them. It isn't as though I make them every day. (But if I could...)
I love biscuits. Probably because they're like butter made crispy and flaky, but I see no reason to hold that against them. It isn't as though I make them every day. (But if I could...)
BISCUITS & SCONES
Baking 101 – Spring 2008
ABOUT BISCUITS
Biscuits are a lot like quickbreads: rich and buttery, flaky and crumbly quickbreads. This is due, for the most part, to a much higher ratio of fat to starch, and to how that fat is distributed throughout the biscuit. Though the process for making them is both quick and simple, it requires careful attention and good technique. Their proper texture depends on the fat being dispersed properly throughout, with leavening provided by baking powder. When made without eggs, the starch structure can be very delicate; the addition of eggs gives a softer, cakier texture, thanks to the egg’s proteins.
Biscuits are made from a very soft, moist dough, generally with as little handling as possible to minimize the gluten. There are occasional exceptions: some use a small amount of kneading to create layers of dough and fat for a flaky texture; beaten biscuits are worked so thoroughly that they develop and then break the gluten, making the texture delicate again. Most, however, are quick, last-minute preparations that don’t store well. When making biscuits, it’s best to make just enough.
BUTTER, LARD, AND SHORTENING
Biscuits don’t have to be made with butter; most fats that are solid at room temperature will do just fine. Butter, lard and shortening are all commonly used. Butter and lard each have their own unique flavor to bring to the biscuits, while shortening is essentially bland. Butter works well all around, with both sweet and savory variations; lard adds a subtle flavor that’s especially good with savory recipes. You can, of course, always mix different fats together to reach the total amount a recipe calls for.
Oils, which are liquid at room temperature, are no substitute in biscuit recipes. In the biscuit-making process, the fats are not fully incorporated into the flour and other dry ingredients. By remaining solid, fats remain intact in chunks, whereas oils will be absorbed into the flour. It’s the method of combining the ingredients, of cutting instead of mixing, that gives biscuits their special texture.
CUTTING VS. MIXING
Most baking methods require mixing of the ingredients, which produces a homogeneous mass. The ingredients in it, sometimes affected by the method of mixing, determine the texture of the final product. In biscuits, however, the mixing method intentionally leaves sizable particles of fat intact throughout the dough. Referred to as “cutting in” the fat, this intersperses fats between layers of dough. When melted by the heat of the oven, it creates small pockets that fill with evaporating liquid and the carbon dioxide of baking powder, giving lift to the biscuit and creating an irregularly flaky structure. When the fat is completely mixed into the flour, there is no opportunity for lift, leaving a dense biscuit.
There are several different methods for cutting in the fat, all of which attempt to break up the fat into smaller pieces, leaving some whole and incorporating some of the rest into the dry ingredients. Pastry blenders, food processors, a pair of knives or even rubbing with the fingertips; all of these can work. The only essential part is that the fat never melt. Chill it ahead of time and work quickly.
The size of the remaining fat particles will determine the final texture of the biscuit, and is usually described by the size of the largest remaining pieces. When they resemble peas, the biscuits will have a flakier, more layered structure; when they resemble breadcrumbs, the texture will be fluffier. Pieces that are too large will leave gaping holes inside that can then cause the biscuits to collapse or tip sideways.
After the fat has been worked into the flour, the liquid is added, and worked in just enough to moisten the dry ingredients. The fat is still susceptible to overworking at this point, so a light hand and cold ingredients will help keep the biscuits from becoming dense. If the kitchen is warm, or the process is taking too long, slide everything into the refrigerator to cool off for a time.
PIE CRUSTS, PUFF PASTRY, CROISSANTS
Pie crust is essentially a variation on biscuits. Made without leavening and a bare minimum of liquid – unlike biscuits, a pie crust should be flaky but not risen and airy – the process is nearly identical. Done properly, a skill that takes a few attempts to get under control, a homemade pie crust is worlds apart from the dull, flavorless, mealy-textured variety from the supermarket freezer section.
Puff pastry, on the other hand, is quite distinct. Though light, buttery, and flaky, it derives its texture and rise from very careful and finicky preparation. To start, a dough is made with flour and ice water, and worked as little as possible to prevent gluten from developing. Rolled out into a square, it is topped with a large amount of softened but still solid butter – about half the dough’s weight – and repeatedly folded over onto itself and rolled out. Frequently returning the dough to the refrigerator and varying the direction of the rolling keeps the butter solid and allows the developing gluten to relax. After six “turns,” each of which folds the dough into thirds, the puff pastry has become a sandwich of extremely thin layers of dough and butter: 729 layers of dough separated by 728 layers of solid butter.
Rolled out to the usual thickness of about one quarter inch, each layer of the puff pastry is around one thousandth of an inch thick, roughly the thickness of an individual starch granule. When baked, the butter melts and its water content evaporates, puffing up the dough into a remarkably airy, delicate texture. The volume can increase by four or more times, depending on the heat of the oven. Shortening, with its much lower water content, can also be used, and produces a crisper, less flavorful puff pastry.
Croissants and Danish pastries are made in much the same way as puff pastry, except that they use a yeast-risen dough. The basic dough is made with flour, yeast and milk, and allowed to rise for one or more hours before deflating and rolling out with butter like puff pastry. The dough is more delicate than that for puff pastry, and so can be more difficult to work with, but is still folded and rolled out to produce hundreds of layers of dough and butter. Danish pastry doughs are often made with even more butter and rolled out only three times, rather than six, producing thicker layers.BASIC ROLLED BISCUITS
Adapted from The Joy of Cooking
Makes about twenty two-inch biscuits
INGREDIENTSDIRECTIONS
- 2 cups all-purpose flour
- 2-½ teaspoons baking powder
- ½ to ¾ teaspoon salt
- 6 Tablespoons unsalted butter, cold, cut into pieces
- ¾ cup milk, cold
NOTES
- If baking, preheat the oven to 450° F. Whisk together the dry ingredients in a large bowl. Drop in the butter and cut into the flour, tossing as you work. When the largest pieces resemble peas, the biscuits will have a flaky, layered texture; when they resemble coarse breadcrumbs, the texture will be fluffier. Stop when you reach the desired coarseness, and do not let the butter melt or form a paste with the flour. Refrigerate if necessary.
- Add in the milk and mix with a rubber spatula, wooden spoon or fork just until most of the dry ingredients are moistened. With a lightly floured hand, bring the dough into a ball and knead gently against the sides of the bowl 5 to 10 times, pressing in any loose bits until they adhere.
- Turn out onto a lightly floured board and roll or pat out into a square about ½ inch thick. (Roll to ¼ to 3/8 inch thick if cooking on a griddle.) Using a sharp knife or biscuit cutter, cut into the desired shape. Squares produce virtually no scraps. The scraps from cutting rounds may be re-rolled to cut a second batch, but these will not be as tender as the first-cut biscuits.
- To bake, place biscuits on a baking sheet. Keep them at least one inch apart for separate biscuits with crusty sides; set them close together for biscuits that will join and remain soft on the sides. Bake until golden brown on the top, about 10 to 12 minutes. For browner tops, brush with milk or melted butter before baking.
- To cook on a griddle, preheat the griddle (or a frying pan) over medium-high heat. Cook until brown on the first side, 3 to 4 minutes, then flip and cook until the other side is brown and the middle cooked through.
- Always serve biscuits as soon as possible. They do not keep well. If you have any leftover the next day, split them in half with a fork and warm in a toaster oven. Storing them any longer, especially in a sealed container, generally results in mold growth by the second day.
- Like quickbreads, biscuits take well to additional ingredients. As a general rule, keep any extras to 6 Tablespoons or less. Cheese is an exception: add up to ½ cup of hard Parmesan-style cheeses; add up to ¾ cup of semi-hard Cheddar-style cheeses. When adding cheese, you may wish to reduce the salt and lower the baking temperature to 425° F.
- For whole-wheat biscuits, replace ½ cup of the flour with whole-wheat flour.
- For buttermilk biscuits, replace the milk with buttermilk, reduce the baking powder to 2 teaspoons, and add ½ teaspoon of baking soda.
CRANBERRY SCONES
Adapted from The Joy of Cooking
Makes eight scones
INGREDIENTSDIRECTIONS
- 2 cups all-purpose flour
- 1/3 cup sugar, plus more for dusting
- 1 Tablespoon baking powder
- ½ teaspoon salt
- 6 Tablespoons unsalted butter, cold, cut into pieces
- ½ cup dried, sweetened cranberries (or raisins)
- 1 large egg
- ½ cup plus 1 Tablespoon heavy cream, plus more for brushing tops
- 1 teaspoon grated lemon zest
NOTES
- Preheat the oven to 425° F. Whisk together the flour, sugar, baking powder, and salt in a large bowl. Drop in the butter and cut into the flour, tossing as you work, until the largest pieces resemble peas. Do not let the butter melt or form a paste with the flour. Refrigerate if necessary.
- Stir in the cranberries. Whisk the egg, cream and zest together in a small bowl, and add to the dry ingredients all at once. Mix with a rubber spatula, wooden spoon or fork just until most of the dry ingredients are moistened. With a lightly floured hand, bring the dough into a ball and knead gently against the sides of the bowl 5 to 10 times, pressing in any loose bits until they adhere.
- Turn out onto a lightly floured board and pat out into an 8-inch round of even thickness. Using a sharp knife, cut into eight wedges. Place on a baking sheet, at least ½ inch apart, and brush the tops with a light layer of cream. If desired, sprinkle with a little additional sugar.
- Bake until the tops are golden brown, 12 to 15 minutes. Cool on a rack or serve warm.
- For flakier scones, omit the egg and increase the cream by ¼ cup. Proceed with the recipe as above.
- For a simplified version, omit the butter and egg, and increase the cream to 1-¼ cups. Proceed with the recipe above.
12 March 2008
Hook's 12-year.
Lewisburg.
Hook's 12-year cheddar - some of Wisconsin's finest - gets a nod in today's Los Angeles Times. After all, it really is some spectacular cheese.
Hook's 12-year cheddar - some of Wisconsin's finest - gets a nod in today's Los Angeles Times. After all, it really is some spectacular cheese.
Baking Class - Quickbreads.
Lewisburg.
The quickbreads class was as popular as one might expect. Students made their own recipes from start to finish - without all that waiting around for yeast - and went home with plates of buttermilk cornbread and applesauce muffins. Plus, there's this little spark in their eyes whenever they get something loaded with sugar... it'll be interesting to see the reaction to a real sponge cake in the final class.
Of course, there were a few little mix-ups, now that the students were doing all the work. Recipe-reading skills could use some honing, for example. But that came with some good questions, too - including ones about what I'll be teaching next semester. Overall, a good sign.
QUICKBREADS
Baking 101 – Spring 2008
ABOUT QUICKBREADS
Unlike yeasted breads, quickbreads don’t rely on yeast to produce leavening power or gluten to harness it. And rather than being made from doughs, which have enough character to be picked up and shaped, quickbreads are made from batters. Quickbread batters are typically thicker than those used for pancakes; they’re easier to spoon than to pour. And, since they’re stiffer and hold their shape better, they can be made into various shapes, usually loaves or muffins.
Quickbreads get their rising power from chemical leavening agents, and don’t need to wait on the activity of a colony of yeast before baking. Their moist, dense, somewhat coarse texture is due to, in most recipes, moderate amounts of sugar, fat and egg. Since the process for making quickbreads isn’t much more complicated than stirring together the various ingredients, these types of recipes are easy to modify, generally forgiving of mistakes, and can be made in larger or smaller batches simply by scaling ingredient amounts.
Just about any quickbread loaf recipe can be baked as muffins, and vice versa. Though times may vary depending on oven temperature and the actual quantity of batter used, loaf quickbreads usually take 50 minutes to an hour in a 350° F oven. Muffins, in a 400° F oven, take about 15 to 18 minutes for standard-sized, 10 to 12 minutes for miniature, and 22 to 25 minutes for jumbo. Lower oven temperatures are more forgiving for overcooking, but will not crisp up the edges as much.
CHEMICAL LEAVENING
In lieu of yeast, various chemical compounds provide the lift for quickbreads. There are two general types: baking soda and baking powder. Some recipes may call for one or the other; many call for a certain amount of both. They aren’t interchangeable, so be careful.
Baking soda is also known as sodium bicarbonate, and works by reacting with acids in the batter to produce carbon dioxide. Add some vinegar to a spoonful of baking soda in a glass and watch it foam. It reacts immediately, which means that recipes that call for it alone must be baked as soon as they are mixed. As the batter sits, the leavening bubbles will escape, leaving you with a particularly rock-solid muffin. Common acids used to get this reaction include buttermilk, yogurt, molasses, fruit juices, and vinegar. If a recipe calls for buttermilk and you have none, you can make clabbered milk by mixing about two teaspoons of vinegar with a cup of milk and resting it for a few minutes. The taste isn’t the same, but the effect in the recipe will be.
Baking powder is a mixture of sodium bicarbonate and one or more dried, crystalline acids, with some dry starch to prevent the two from prematurely reacting. When dissolved in liquid, the acid-base reaction takes place, producing the carbon dioxide gas needed for leavening. Most available baking powders are referred to as “double-acting,” meaning that not all of the acids present will react as soon as a batter is mixed. Some of the reactions won’t occur until the heat of baking initiates them, thus giving a second rise while in the oven. Recipes that call for both baking soda and baking powder often rely on the baking soda as a means to neutralize the acidity of other ingredients in the batter. The baking powder, in these cases, is intended to provide much of the lift.
Due to humidity in the air, the ingredients in baking powder will slowly react and lose their leavening power over time; it’s best to replace your supply once a year, regardless of how much is left in the container. You have a choice when purchasing baking powder, between those containing aluminum – in the form of sodium aluminum sulfate – and those without. There are concerns that even small amounts of aluminum intake can have negative health effects, though the science so far is inconclusive. “Aluminum-free” baking powders also seem to be free of the “metallic” and bitter taste baking powder can sometimes lend to baked goods. The choice is up to you.
Occasionally, you may find a recipe that calls for “self-rising” flour, particularly in British cookbooks. This type of flour contains approximately 1-½ teaspoons of baking powder per cup. Avoid using it. You can simply adjust the recipe to work with all-purpose flour and baking powder, and thus avoid having a too-specific ingredient taking up shelf space.
GLUTEN-FREE TEXTURE
The distinctive texture of quickbreads and muffins – dense and moist, with a coarse crumb that breaks apart into irregular chunks – is due to the ingredients and mixing method. Or, rather, the near lack of mixing. As in breads, starch is still a key structural player, sometimes buttressed by egg proteins, but in this case it isn’t the formation of gluten that’s desired. In quickbreads, the ingredients are brought together quickly, often with the dry ingredients mixed together in one bowl, and the wet ingredients in another. (Sugar, since it dissolves so easily into liquids, is often considered a “wet” ingredient.) Recipes stress avoiding “overmixing,” which can be difficult to judge without experience. Generally, lumps in the batter will bake out, as long as there are no large clumps of flour remaining unmixed.
Overmixing is a problem because it begins to develop gluten. Although the various fats, proteins and sugars in the other ingredients do a fair job of minimizing that, it can still happen. The texture then changes to something less tender, with a finer crumb – except where there are large pockets of air space. Where gluten starts to develop, it traps the leavening gases inside, producing large tunnel-like cavities. If you see those as you slice through a muffin, make a note to stop mixing a little sooner the next time.
The goal is to thoroughly mix the dry ingredients and the wet ingredients while in separate containers, so that very little mixing is required when the two are combined. Another reason to be thorough in the pre-mixing is to ensure there are no clumps of leavening agents left in the dough. These will taste decidedly bitter if anyone bites into one, and have a tendency to produce funny colors in the presence of certain ingredients: blueberries, carrots and sunflower seeds turn green; walnuts turn blue. This can also happen if there’s too much baking soda in the batter, regardless of how well it’s mixed in.
THE ROLE OF FATS AND OILS
Fats function as tenderizers in baked goods, and also help to maintain a moist texture; although they don’t hold on to water in the finished product, the fats themselves give that sensation. Fats aren’t as effective in slowing staling as they are in other baked goods, however. Because they’re minimally mixed, the fat remains unevenly distributed, and doesn’t protect much of the starch from losing its moisture.
Temperature can also be a concern. As with most baked goods, quickbreads are usually best kept at room temperature, not in the refrigerator. This is a particular issue with those that use butter; because it solidifies at a higher temperature than vegetable oils, refrigerated butter-based goods can develop a distinctly unpleasant texture. Long-term storage in the freezer is a different case, however. Wrapped so that they’re airtight, quickbreads can be frozen, then reheated in a 350° F oven until hot, without any unpleasant changes.
It is possible to make quickbreads with less fat, yet keep that same sense of moistness. Low-fat quickbreads will not keep as long as the regular sorts, and so should be eaten within a day or so. Some recipes simply reduce the butter or oil and replace it with some extra milk or orange juice; these are more prone to overmixing than usual, and will stale quickly. Others, such as the muffin recipe below, use applesauce to provide moisture in place of some dairy and fat. They are a little more forgiving, and tend to resist staling almost as well as other muffin recipes.BUTTERMILK CORNBREAD
Makes one 9-inch round loaf
INGREDIENTSDIRECTIONS
- 1 cup cornmeal
- 1 cup flour
- ½ Tablespoon baking powder
- ½ teaspoon baking soda
- ½ teaspoon salt
- 1-¼ cups buttermilk
- 2 eggs
- 4 Tablespoons butter (½ stick)
NOTES
- Preheat the oven to 425° F, with a 9-inch cast iron skillet in the oven. In a large bowl, whisk together the cornmeal, flour, baking powder, baking soda and salt.
- Melt the butter in a small saucepan. Beat the eggs into the buttermilk into well combined, and mix in the melted butter. Stir into the dry ingredients until just combined, being sure to break up any clumps of flour. Avoid overmixing; a few lumps aren’t a problem.
- Pour the batter into the hot skillet, and return to the oven. Bake for twenty minutes, or until the top has turned golden brown. Allow to cool for a moment in the pan, then transfer to a cooling rack.
- Any oven-safe pan will work in lieu of cast iron, including muffin tins, though the bottom crust may not form quite as nicely. Adjust the cooking time as needed for different shapes.
- Like most quickbreads, cornbread takes well to additional ingredients. Include up to ½ cup of grated cheese, fresh corn kernels, diced onion and chilli peppers, or anything else that seems good.
APPLESAUCE MUFFINS
Adapted from 7th grade home economics class, Lionville Junior High
Makes about one dozen
INGREDIENTSDIRECTIONS
- 1 cup sugar
- ½ cup butter (1 stick), softened
- 1-½ cups all-purpose flour
- 1 teaspoon baking powder
- ¼ teaspoon baking soda
- 1 teaspoon cinnamon
- 1 teaspoon ground ginger
- ½ teaspoon salt
- 2 eggs
- 1 cup smooth applesauce
- ½ cup cinnamon chips (optional)
NOTES
- Preheat the oven to 350° F. Grease a 12-cup muffin tin or line with paper cups. In a bowl, mix together the dry ingredients: flour, baking powder, baking soda, cinnamon, ginger and salt.
- In a large bowl, cream together the butter and sugar until light-colored. Mix in the eggs, one at a time, followed by the applesauce. Add in the dry ingredients in three parts, stirring to combine each completely before adding the next. If using, gently fold in the cinnamon chips.
- Spoon the batter into the muffin cups; each should be about 2/3 full. Bake for 25 to 30 minutes, or until a toothpick inserted in the center comes out clean. Remove to a rack to cool.
- As these muffins are relatively low-fat, they will go stale more quickly than standard muffins. Eat them as close to freshly baked as possible.
Subscribe to:
Posts (Atom)