
We had pizza for dinner last night. It's been an evolutionary process to get here:
Let me note that getting a pizzeria-like crust from a home oven is far more difficult than you'd expect, for one reason: professional pizza ovens (and wood-fired brick ovens) hang out in the neighborhood of 700° to 800°F. Sometimes up near 900°F. Mine only threatens to get near that range during the self-clean cycle, during which the door latch safety mechanism makes it really tough to get the pizzas in and out. So even cranked up to full blast, a home oven can't get a traditional pizza crust, well, crusty.
At least not beneath the sauce, cheese, and other various toppings. It'll still taste good, of course, but it's just not quite right. It's frustrating.
I stumbled across a key bit of information on Baking Bites, in a post for the Perfect Pizza Crust. Higher-protein flours absorb more water, which helps keep the crust from drying out in the professional oven... but results in a soft crust at home. Switching to all-purpose flour is an improvement, but still not quite perfect. The Baking Bites solution - from a recipe in Cook's Illustrated - uses a combination of all-purpose and cake flours to achieve crispiness.
Problem: I don't like cake flour. Yes, I do have some in the pantry, but I avoid it whenever I can. It's undergone some serious bleaching and other treatments, which I'd just as soon not rely on for situations that don't demand it. I'll even make cakes with all-purpose flour, which still makes for a delicious dessert, though with a slightly denser and drier texture.
Solution: pastry flour. It's low-protein flour, with great flavor if you've got a whole wheat version, like most organic brands.
In brief, here's how I'm making pizzas these days:
- Make the dough for the crust with a mix of all-purpose and pastry flours. I like 225g total for a 12-inch pizza, and, though it may need some tweaking, I think 175g all-purpose and 50g pastry flour works well. Add 5g salt, an appropriate amount of yeast1, and 157g water (70% hydration). Mix together, knead briefly, and set aside to rise.
- Make the sauce, with whatever tastes good. Cook it down until the tomatoes have completely lost their structure and a lot of moisture. Puree and set aside.
- For toppings, I keep it very simple. A small amount of thinly sliced or shredded cheese when we're not feeding vegans. Perhaps some mushrooms sauteed until crispy, or a few caramelized onions. Fresh herbs, in season, can wait until the pizza comes out of the oven.
- Stretch the dough into a 12-inch round. If necessary, set it down during the stretching process to let the gluten relax. You'll want it thin, but avoid tearing it; fold over holes and pinch together to patch them. I like to grab about an inch in from the edge to create a rim of crust and pull apart gently while rotating the dough. It's not nearly as impressive as spinning and tossing, but a lot safer. I also think it's even easier than laying the dough flat and stretching, because you're letting gravity do a lot of the work.
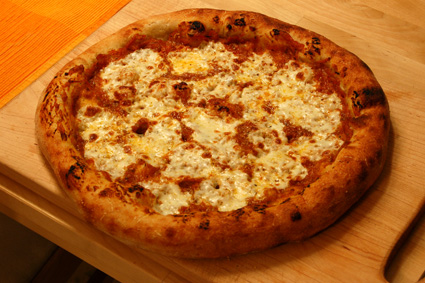
- When the oven's as hot as it'll get - 550°F here, with the pizza stone well preheated2 - lay the crust on a peel dusted with cornmeal. Make sure it's not sticking. Brush on a light layer of olive oil, then spread with just enough sauce to almost cover. Top with cheese or whatever, and slide into the oven. Bake until it's brown and crispy. I find that seven to eight minutes works. Allow to cool on a rack for a few minutes, which'll help keep the underside from getting soggy after all that work.
Enjoy the fact that it's good, simple food. But no less impressive for it.
EDIT: Mis-typed the quantity of salt for the pizza dough. It's a lot less over-salted now.
* * * * *
1Half a teaspoon works for a one- or two- hour rise; scale it back to a quarter or an eighth for overnight, depending on how long it'll go. Or use the fridge to retard the rising. I pretty much never do, though it's mostly a function of lack of space.
2The oven beeps (or whatever) to say it's preheated? It's lying. They all do. Give it at least another half an hour, especially to ensure that the pizza stone is up to temperature, too.
2 comments:
Nice. I still use your pizza dough recipe every time I make it. Funnily enough, my stumbling block is trying to find a suitably warm place for the dough to rise. The solution presented itself over Christmas - James bought the cat one of those faux-shearling radiator bes which Bosco just won't use, but it's absolutely perfect for holding a bowl of rising dough near enough to stay warm!
How cold's the boat these days? In the wintertime, our house is a bit cooler than yeast might prefer, but a slightly extended rise time and the initial oven spring take care of any less-than-ideal size doubling. When I'm working with shorter rise times ('cause I didn't think of making dough the day before) I'll usually use water that's warmed a little above body temperature. That really helps kick-start the process.
Post a Comment