10 June 2007

Strawberries!

Madison.

Strawberry patch

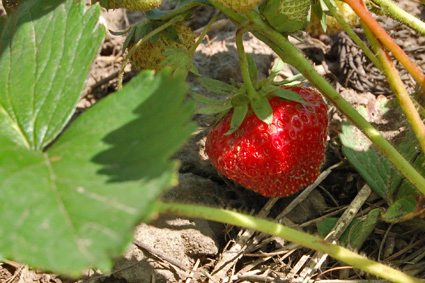
'Tis the season for strawberries, that sure sign of summer's imminent arrival. Local strawberries, of course, and preferably organic ones. I don't care if California berries are available virtually year-round; if the tips aren't red when they're picked, I'm not interested. And the shelf life of a ripe strawberry1 isn't enough to get them very far.

We're just shy of pick-your-own strawberry season on the farm - it starts on Friday - but being an employee means I get the perk of stopping by to harvest as the urge strikes. So, on Saturday afternoon, Sharon and I picked a little over two quarts' worth of ripe berries to enjoy for the week. Or as long as they last.

Strawberries

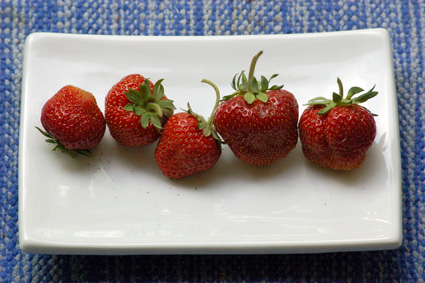
They're great just brushed clean - washed only when necessary - or macerated in sugar and booze, be it wine, rum or Grand Marnier. Or, in our case, the Triple Sec that's hanging about from the last time we made margaritas. Add a little of your favorite rich, dairy goodness - cream's traditional, but there's nothing wrong with yogurt, a soft cheese or ice cream - and it's about as good as dessert gets.

Of course, when you also have a few pounds of fresh rhubarb lying about, a little extra effort's highly rewarding. Though most people seem to think of the strawberry-rhubarb combination2 first and foremost, their seasons don't overlap for long, at least around here. The flavors complement each other well, but it's a short window in late spring.

So, when the chance is there, it's best to run with it. Saturday night, with fresh berries and rhubarb, it was time for cobbler. Yes, pies are nice, but my crust-making skills are marginal. And I wanted something with more crunch to it than shortcake or clafoutis. What could possibly be better - or easier - than fruit cooked with free-form biscuits? That's all that a cobbler is - fruit and sugar on the bottom, with biscuits baked on top.

Strawberry rhubarb cobbler

This recipe's swiped (nearly) directly from Joy, but it was good right out of the oven, a day later on a picnic, and so easy that it's worth making again.
Strawberry Rhubarb Cobbler
Makes six to eight servings

Ingredients
  • Cornmeal cobbler biscuit dough (below)
  • 1¼ pounds rhubarb, sliced into ¼-inch pieces
  • 1 pint strawberries, hulled and cut into bite-size pieces
  • ½ cup sugar
  • 2 tablespoons flour
Cornmeal cobbler biscuit dough:
  • 1 cup all-purpose flour
  • 1/3 cup cornmeal
  • 2 tablespoons sugar
  • ½ tablespoon baking powder
  • ½ teaspoon salt
  • 5 tablespoons cold, unsalted butter
  • ½ cup cold milk
Directions
  1. Preheat the oven to 375°F. Mix the rhubarb, strawberries, sugar and flour together in a bowl, and allow to sit for at least fifteen minutes. Pour the mixture - juices and all - into a 9-inch pie pan, an 8x8-inch baking pan, or any dish of similar size.

  2. Prepare the biscuit dough, as follows: whisk together the flour, cornmeal, sugar, baking powder and salt in a bowl. Using a pastry cutter or a pair of knives, cut in the butter until there are chunks no larger than small peas. Add in the milk, stirring just until the dough comes together. Knead against the side of the bowl a few times until any loose pieces are incorporated.

  3. On a lightly floured board, roll or pat out the cobbler dough until roughly the shape of the baking dish. (Alternately, you can cut it into shapes, make a lattice, or simply pinch off walnut-sized wads.) Set on top of the fruit mixture - cut a few steam vents if covering the fruit completely - and dust with sugar.

  4. Bake until the juices are bubbling and the dough is golden brown, approximately 45 minutes. All to cool for 15 minutes before serving, either on its own or with some vanilla ice cream.
* * * * *

1Which is still more than ripe raspberries, another seasonal delight that's unparalleled straight from the berry patch.

2Strawberry-rhubarb pie being the usual, but I'm partial to the strawberry-rhubarb bars from Cress Spring Bakery. I've been enjoying one nearly every week for the past month and a half.

How to cut apart a whole chicken.

Madison.

Selling chickens at the farmers' market, there's one question I often get that's always a little depressing:
Typical question: Do you have chicken breasts?

Typical response: Yes. They're attached to the rest of the bird.
Some people are mildly amused by this, but it doesn't do much to sell chickens. It's part of that dance you have to do with people you know'll never buy anything. Then there's a step beyond, where the (unlikely) customer's comment is a dismissal, a slight apology that she1 would feel bad buying a whole bird. Think of all that waste!

As if purchasing boneless, skinless chicken breasts at a grocery store - shrink-wrapped in plastic, free of any evidence of their origin - didn't result in waste. Who buys chicken backs? Or excess chicken skin? Or even a quantity of dark meat to offset the sheer volume of chicken breasts consumed? Presumably some of it does get sold, somewhere, somehow,2 though I haven't any real idea as to the details. Heavily processed food products or CAFO animal feed, I suppose.

I then discovered that most of the other workers on the farm - all of whom have the opportunity to take a chicken home each week - didn't really know how to cook a chicken. Four of them did manage to roast a chicken one night, though they spent a good deal of time second-guessing each other. Parts are easier to deal with, as a general rule, but none of them knew how to cut up a chicken. In the end, it turned out well; that said, four people spending three hours roasting a chicken each week seems a bit much.

Below's my preferred method for breaking down a whole chicken. Sure, there are all sorts of different ways to do it, depending on what the end product's supposed to be, but this method covers most of the bases. Leaving the breasts on the bone is another good alternative, as is butterflying, but those'll have to wait until another time.

How to cut apart a whole chicken.

Step one: Purchase a whole chicken and thaw it thoroughly, if necessary. The refrigerator's a good place, if you have a few days; a sink full of cold water's even better.3 Microwave defrosting's generally poor, as it tends to partially cook some sections while leaving others still frozen; a kitchen countertop's an open invitation to food poisoning. Same goes for a low oven.

Make sure to remove the neck and giblets from the chicken's gut cavity. Cook 'em up as you like or save them for the stockpot. (Except for the liver. Liver in stock equals unpleasantness.)

Get a large, sharp knife, if possible. I like to use a heavy chef's knife with an eight-inch blade, but I've done it with a bargain-bin serrated steak knife when pressed. The results aren't as nice, and it certainly takes longer, but you work with what you've got.

Latex gloves are helpful, but not necessary. I use one for my left hand, to keep it clean, and don't let my right hand touch anything but the knife handle so it's free to turn the water on and off, grab paper towels, etc. If you go bare-handed, you'll just need to wash thoroughly with hot, soapy water before touching anything around the kitchen. A faucet that can be operated with your elbows is a real plus in this case.

Set the whole chicken on a cutting board, breast side up, like so:

whole chicken

The first step is to remove one of the leg quarters. Grasping the end of the drumstick, pull the leg away from the body until the skin pulls taut. Slice down through the skin, and through the flesh surrounding the hip joint, all the way around. You should be able to figure out where the joint is located by moving the leg around.

When you've cut down to the joint, roll the bird on its side and, holding firmly on the thigh, bend the leg over the back until it the bone pops out of the hip joint. Use the knife to cut the connecting tendons - the blade should be able to slide easily through the space between the ball and socket of the joint - and set the leg quarter aside. Repeat with the other leg.

removing chicken leg

Removing the wings is a similar process, although the joint is a little more difficult to locate. Rotate the wing until you can identify the shoulder joint, and cut carefully all around, through the skin and flesh around the bone. Bend the wind over the back until the joint pops loose, and cut the tendons with the knife, just like with the leg quarters. Set aside and repeat with the other wing.

removing chicken wing

To remove the breast meat from the rib cage, locate the ridge of the keel bone with your finger. Make a long, shallow cut just to one side of the bone, following the edge of the keel bone and turning to following the curve of the wishbone near the neck.

Using the tip of the knife, slide the blade against the surface of the bone. The blade will follow the curve of the bone, allowing you to remove the breast in one clean piece. Until you get the knack for it, use small, brief strokes; the skeletal shape will reveal itself as you work. Repeat for the other breast.

removing chicken breast

Now's the time to cut apart the leg quarters into thighs and drumsticks. Like before, you'll want to flex the joint - in this case, the knee - to determine where to cut. Slice all the way around, until you can see the connection between the two bones. Rather than snap them apart, you'll want to work the tip of the knife into the joint, cutting apart the tendons; do it correctly, and the two pieces will simply fall apart.

This may be the toughest joint to locate visually, and requires the most care with a knife. If you're not confident with your knife skills, consider leaving the leg quarters intact until after cooking.

splitting chicken leg

This leaves the following chicken pieces:
  • Two (2) boneless breasts
  • Two (2) thighs
  • Two (2) drumsticks
  • Two (2) wings - which could also be broken down into smaller pieces at the joints
  • Miscellaneous chunks of carcass and giblets (not pictured)
chicken parts

The remains of the carcass are best used in the stockpot; freeze the parts in zip-top freezer bags until you're ready. Some small pieces, like the heart, gizzard, pope's nose, etc., can always be cooked up as a little snack while you're making the rest of dinner. You can also keep an eye out for large fat deposits - there's often one around the tail, and a smaller one around the throat - for rendering schmaltz (chicken fat).

Though it may seem imposing the first time around, cutting apart a chicken becomes easy with just a little practice. This time, I was able to go from bird to pieces in seven minutes, including the pauses to take photos with my clean hand. The same process applies to other birds, including ducks and turkeys, though be sure to watch carefully for places where the bone structure is slightly different.

More work than buying shrink-wrapped meaty bits right off the shelf? Yes, but not by much.

* * * * *

1It could be anyone of any gender, but the first time I heard this was from a middle-aged woman, so she's the one I picture each time I think of it.

2I recall reading in the New York Times that most of the chicken wingtips - that half-bone, half-skin, no-meat bit beyond the typical Buffalo wing parts - in the United States are shipped to China. For what I don't know.

3Moving water's even better, having to do with better heat transfer with water rather than air, and with moving fluids rather than still ones.

06 June 2007

Chicken confit.

Madison.

chicken confit

Slow-cooking - be it braising, stewing, slow-roasting, etc. - has a way of transforming raw foods into intensely flavorful dishes. While it's pretty much the only way to cook up tough cuts of meat, like beef cheeks or lamb shanks, it's also a great way to work wonders on vegetables like tomatoes and onions, deepening the flavors by eliminating excess moisture and caramelizing the natural sugars. But confit takes it all a step further.

Confit, originally a French method for preserving meat - as Harold McGee notes, the word "comes via the French verb confire, from the Latin conficere, meaning 'to do, to produce, to make, to prepare'" - is still well worth the effort for the rich, flavorful, fall-off-the-bone result. Traditionally it's made with duck or goose, the meat salted and seasoned, then slow-cooked in fat; once cooled, the fat congeals to create an airtight environment that protects the confit for weeks or even months. Confit works for any flavorful cut of meat, though, and with whatever fat or oil is handy. If you happen to have loads of duck fat just lying around, by all means, but the rest of us have to work with what we've got.

Working on a farm that raises chickens means that I've got as much as - if not more than - I can handle, and I'm always looking for new ways1 to prepare it. Especially if it's something that can be readily adapted to non-chicken dishes. (Barbecue pork not being at all like barbecue chicken, for example - but that's something for another time.)

My first attempt was with chicken leg quarters, using a recipe adapted from Charcuterie. I'd roasted up the breast for another dinner, setting aside the legs. After a day's rest, rubbed with salt and spices, I slow-cooked them in lard for hours, then let it all "ripen" in the refrigerator for a week. Just before serving, I roasted the legs in the oven, warming them through while crisping up the skin. Since I forgot to write it down as I did it, here's something close to what I made:

Confit of chicken legs
Note: ingredients are scaled per pound of meat

Ingredients
  • 1 lb. Chicken leg quarters
  • 8 grams kosher salt
  • 1 bay leaf, crumbled
  • 3 juniper berries, smashed
  • 1/4 teaspoon coarse black pepper
  • 1/8 teaspoon ground cloves
  • Lard as needed
Directions
  1. Sprinkle the chicken evenly all over with the salt, and place in a nonreactive container.

  2. Mix the spices together and spread over the chicken. Cover with plastic wrap and refrigerate overnight, up to 48 hours.

  3. Rinse under cold water, wiping off the seasonings. Pat dry.

  4. Preheat the oven to 200°F.

  5. Place the leg quarters in a pot, in one layer or two; be sure that you have enough fat to cover the meat completely. Cover with fat and bring to a simmer over medium-high heat, then transfer to the oven. Cook until the legs are completely tender and the fat has become clear, from six to ten hours.

  6. Remove from the oven and cool to room temperature in the pot; then refrigerate. If the chicken is not completely submerged in fat, add additional melted lard to cover. Store, covered, for up to a month.

  7. To serve, remove from the refrigerator several hours ahead to allow the fat to soften. (If the fat is too firm, the legs may tear apart as you try to remove them.) Preheat the oven to 425°F.

  8. Remove the legs from the fat. Place on a baking sheet and roast until the meat is warmed through and the skin is crisp, about 15 to 20 minutes. Alternately, sear in a hot pan to crisp the skin, then finish in the oven, 5 to 10 minutes.
Serving suggestions for the confit generally include whatever greens are in season, from a mixed green salad to wilted spinach to Brussels sprouts, but it'd also make for a fine pasta topping, exceptional tacos, or anyplace where an intensely flavored meat works as a seasoning rather than the bulk of a meal. The seasonings, of course, are infinitely varaiable, and can include pink salt for large quantities intended for long-term storage of up to six months. So's the meat, be it chicken, turkey, duck, pork, venison, or whatever sounds good. And the fat's variable, too: duck fat and lard work wonders, but Mark Bittman even uses olive oil for a turkey confit. But, you may ask, why go to all this trouble? As Ruhlman notes in Charcuterie:
"I asked a chef friend, a teacher expert in the ways of preservation, Dan Hugelier, why now, given that we can 'preserve' food fine in a fridge or freezer or in Cryovack, sealed in oxygenless packages, why was confit ... still relevant? Dan looked at me as if I were an idiot and said, 'Taste.'"
* * * * *

1Not that roast chicken and barbecued chicken don't get a strong showing. And fried chicken, and chicken soup, and so on and so forth.