
Selling chickens at the farmers' market, there's one question I often get that's always a little depressing:
Typical question: Do you have chicken breasts?Some people are mildly amused by this, but it doesn't do much to sell chickens. It's part of that dance you have to do with people you know'll never buy anything. Then there's a step beyond, where the (unlikely) customer's comment is a dismissal, a slight apology that she1 would feel bad buying a whole bird. Think of all that waste!
Typical response: Yes. They're attached to the rest of the bird.
As if purchasing boneless, skinless chicken breasts at a grocery store - shrink-wrapped in plastic, free of any evidence of their origin - didn't result in waste. Who buys chicken backs? Or excess chicken skin? Or even a quantity of dark meat to offset the sheer volume of chicken breasts consumed? Presumably some of it does get sold, somewhere, somehow,2 though I haven't any real idea as to the details. Heavily processed food products or CAFO animal feed, I suppose.
I then discovered that most of the other workers on the farm - all of whom have the opportunity to take a chicken home each week - didn't really know how to cook a chicken. Four of them did manage to roast a chicken one night, though they spent a good deal of time second-guessing each other. Parts are easier to deal with, as a general rule, but none of them knew how to cut up a chicken. In the end, it turned out well; that said, four people spending three hours roasting a chicken each week seems a bit much.
Below's my preferred method for breaking down a whole chicken. Sure, there are all sorts of different ways to do it, depending on what the end product's supposed to be, but this method covers most of the bases. Leaving the breasts on the bone is another good alternative, as is butterflying, but those'll have to wait until another time.
How to cut apart a whole chicken.
Step one: Purchase a whole chicken and thaw it thoroughly, if necessary. The refrigerator's a good place, if you have a few days; a sink full of cold water's even better.3 Microwave defrosting's generally poor, as it tends to partially cook some sections while leaving others still frozen; a kitchen countertop's an open invitation to food poisoning. Same goes for a low oven.
Make sure to remove the neck and giblets from the chicken's gut cavity. Cook 'em up as you like or save them for the stockpot. (Except for the liver. Liver in stock equals unpleasantness.)
Get a large, sharp knife, if possible. I like to use a heavy chef's knife with an eight-inch blade, but I've done it with a bargain-bin serrated steak knife when pressed. The results aren't as nice, and it certainly takes longer, but you work with what you've got.
Latex gloves are helpful, but not necessary. I use one for my left hand, to keep it clean, and don't let my right hand touch anything but the knife handle so it's free to turn the water on and off, grab paper towels, etc. If you go bare-handed, you'll just need to wash thoroughly with hot, soapy water before touching anything around the kitchen. A faucet that can be operated with your elbows is a real plus in this case.
Set the whole chicken on a cutting board, breast side up, like so:
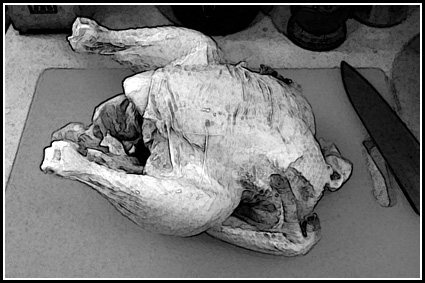
The first step is to remove one of the leg quarters. Grasping the end of the drumstick, pull the leg away from the body until the skin pulls taut. Slice down through the skin, and through the flesh surrounding the hip joint, all the way around. You should be able to figure out where the joint is located by moving the leg around.
When you've cut down to the joint, roll the bird on its side and, holding firmly on the thigh, bend the leg over the back until it the bone pops out of the hip joint. Use the knife to cut the connecting tendons - the blade should be able to slide easily through the space between the ball and socket of the joint - and set the leg quarter aside. Repeat with the other leg.
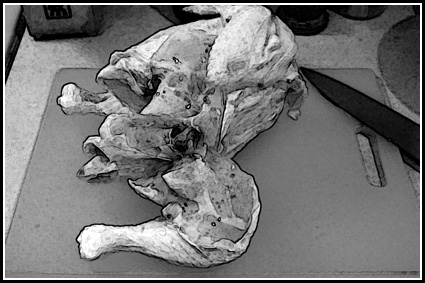
Removing the wings is a similar process, although the joint is a little more difficult to locate. Rotate the wing until you can identify the shoulder joint, and cut carefully all around, through the skin and flesh around the bone. Bend the wind over the back until the joint pops loose, and cut the tendons with the knife, just like with the leg quarters. Set aside and repeat with the other wing.
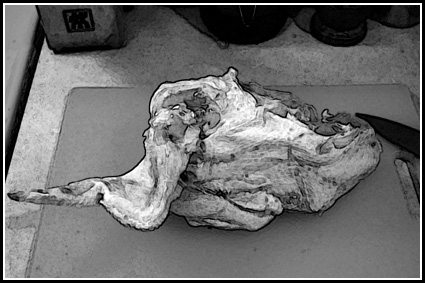
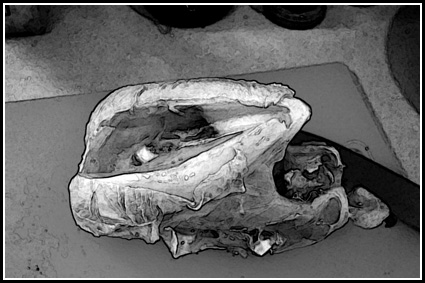
To remove the breast meat from the rib cage, locate the ridge of the keel bone with your finger. Make a long, shallow cut just to one side of the bone, following the edge of the keel bone and turning to following the curve of the wishbone near the neck.
Using the tip of the knife, slide the blade against the surface of the bone. The blade will follow the curve of the bone, allowing you to remove the breast in one clean piece. Until you get the knack for it, use small, brief strokes; the skeletal shape will reveal itself as you work. Repeat for the other breast.
Now's the time to cut apart the leg quarters into thighs and drumsticks. Like before, you'll want to flex the joint - in this case, the knee - to determine where to cut. Slice all the way around, until you can see the connection between the two bones. Rather than snap them apart, you'll want to work the tip of the knife into the joint, cutting apart the tendons; do it correctly, and the two pieces will simply fall apart.
This may be the toughest joint to locate visually, and requires the most care with a knife. If you're not confident with your knife skills, consider leaving the leg quarters intact until after cooking.

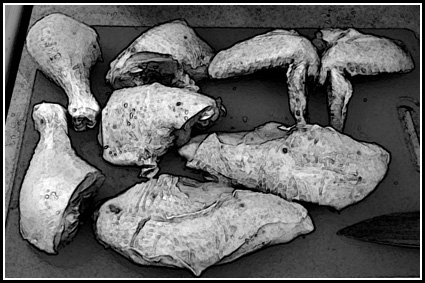
This leaves the following chicken pieces:
- Two (2) boneless breasts
- Two (2) thighs
- Two (2) drumsticks
- Two (2) wings - which could also be broken down into smaller pieces at the joints
- Miscellaneous chunks of carcass and giblets (not pictured)
The remains of the carcass are best used in the stockpot; freeze the parts in zip-top freezer bags until you're ready. Some small pieces, like the heart, gizzard, pope's nose, etc., can always be cooked up as a little snack while you're making the rest of dinner. You can also keep an eye out for large fat deposits - there's often one around the tail, and a smaller one around the throat - for rendering schmaltz (chicken fat).
Though it may seem imposing the first time around, cutting apart a chicken becomes easy with just a little practice. This time, I was able to go from bird to pieces in seven minutes, including the pauses to take photos with my clean hand. The same process applies to other birds, including ducks and turkeys, though be sure to watch carefully for places where the bone structure is slightly different.
More work than buying shrink-wrapped meaty bits right off the shelf? Yes, but not by much.
* * * * *
1It could be anyone of any gender, but the first time I heard this was from a middle-aged woman, so she's the one I picture each time I think of it.
2I recall reading in the New York Times that most of the chicken wingtips - that half-bone, half-skin, no-meat bit beyond the typical Buffalo wing parts - in the United States are shipped to China. For what I don't know.
3Moving water's even better, having to do with better heat transfer with water rather than air, and with moving fluids rather than still ones.
1 comment:
thanks for the clear and concise description. i generally don't eat chicken because of the work involved. i'll check your blog for other interesting pieces now that it's on my radar.
Post a Comment