
It's not that I'm behind the times; it's just that, for recipes not of my own devising, I find that I'd prefer to experiment with them, learn them well, before making something of them. I need to make them mine, play with them, forget them, and come back to them, like settling into an old pair of worn-through, unwashed blue jeans.
Some months ago,1 Mark Bittman's Minimalist column carried a recipe for no-knead bread, creating a stir like recipes rarely do. But bread without kneading? And with the sort of delicate, crust that shatters as you slice it? It wasn't surprising.
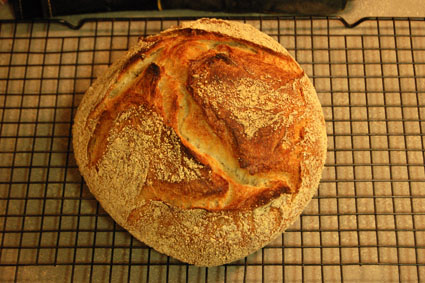
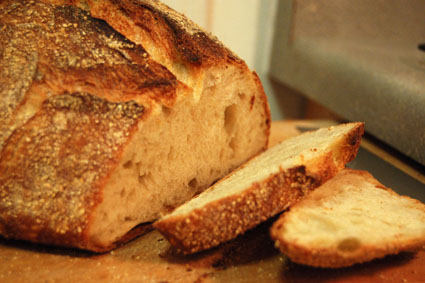
I've made this loaf numerous times since then, continually tweaking it, just to see what happens.2 The first time, almost immediately after the article ran, I made a plain, white bread, using all-purpose flour. The result: stellar, and I've been making it again and again, with great results every time. Especially for Thanksgiving dinner. I have made a few modifications, though, to tailor it just to my taste.
The original recipe:
No-Knead BreadSimple enough, eh? So simple, of course, that it begs for experimentation. So far, I've tried the following:
Adapted from Jim Lahey, Sullivan Street Bakery
Time: About 1½ hours plus 14 to 20 hours' rising1. In a large bowl combine flour, yeast and salt. Add 1 5/8 cups water, and stir until blended; dough will be shaggy and sticky. Cover bowl with plastic wrap. Let dough rest at least 12 hours, preferably about 18, at warm room temperature, about 70 degrees.
- 3 cups all-purpose or bread flour, more for dusting
- ¼ teaspoon instant yeast
- 1¼ teaspoons salt
- Cornmeal or wheat bran as needed.
2. Dough is ready when its surface is dotted with bubbles. Lightly flour a work surface and place dough on it; sprinkle it with a little more flour and fold it over on itself once or twice. Cover loosely with plastic wrap and let rest about 15 minutes.
3. Using just enough flour to keep dough from sticking to work surface or to your fingers, gently and quickly shape dough into a ball. Generously coat a cotton towel (not terry cloth) with flour, wheat bran or cornmeal; put dough seam side down on towel and dust with more flour, bran or cornmeal. Cover with another cotton towel and let rise for about 2 hours. When it is ready, dough will be more than double in size and will not readily spring back when poked with a finger.
4. At least a half-hour before dough is ready, heat oven to 450 degrees. Put a 6- to 8-quart heavy covered pot (cast iron, enamel, Pyrex or ceramic) in oven as it heats. When dough is ready, carefully remove pot from oven. Slide your hand under towel and turn dough over into pot, seam side up; it may look like a mess, but that is O.K. Shake pan once or twice if dough is unevenly distributed; it will straighten out as it bakes. Cover with lid and bake 30 minutes, then remove lid and bake another 15 to 30 minutes, until loaf is beautifully browned. Cool on a rack.
Yield: One 1½-pound loaf.
- Salt. Add more salt. Not that it isn't great as above, but increasing the salt to a scant tablespoon of kosher salt really helps enhance the flavor.
- Longer rising time. I've given loaves anywhere from fourteen to twenty-four hours to rise, and they're better with more time. Not an enormous difference, but the flavor and crumb seem just a shade better. Same goes for the second rise, under the towel. Two hours works well for white bread, but an extra hour definitely helps with denser breads, like whole wheat.
- Whole wheat. Whole wheat makes for a great loaf, and definitely one with a far superior crumb and texture to my old method. I find that one-third whole wheat flour, two-thirds bread flour makes a fairly delicate loaf with great flavor. Half and half also works, but makes for a distinctly denser bread. I have yet to try 100% whole wheat, though the followup Minimalist article noted that others have had some success.
- Flavorings. Dried herbs work perfectly well; fresh herb season has yet to hit since I've been making this bread. The long, wet rising does a great job of rehydrating herbs, even spruce-needle-like rosemary. Amounts vary with different herbs and spices, of course, but I find that two teaspoons for stronger flavors - rosemary, say - and a tablespoon for others, is a good starting point for a perfumed loaf that's not overpowering.
With chunky stuff, like chopped onions, a half cup works for just a hint of flavor. (It seems like a lot at first, but not too much once it's risen.) Stirring them in at first helps give a nice, even distribution in the final loaf. - Liquids. Why limit yourself just to water? Milk, as it does for all breads, produces a soft, tender crumb.3 Beer - granted, it was Sapporo,4 left over from the lunar new year party over the weekend - worked perfectly well, even if it didn't change much of the flavor. Note that one twelve-ounce bottle of beer is just about the perfect amount of liquid for this recipe.
- More liquids. A dark ale, like a good, rich brown ale, is a definite, to see if I can get a good, malty flavor. I'm also planning to try black tea,5 at some point - a double-strength batch, as for iced tea. At some point, even fruit juices - without added sugar, which will only weaken the gluten structure, in addition to the natural acidity of the juice - seem like a worthwhile test.
- Adapt it into other recipes. The long rise with a smaller amount of yeast works well for kneaded doughs, too. In particular, it helps enhance the flavor of other doughs that benefit from a less rustic appearance. I've had great success with cloverleaf dinner rolls, pretzels and pizza crust. And if it saves on kneading effort, it can only be a plus.
- Cornmeal. Sharon and I love adding a little cornmeal to pizza dough, which really weakens the structure, but gives it a distinct sweetness that works well with the acidity of the tomato sauce and any other strongly flavored toppings. Usually, we make it on a fairly short notice, but I expect that an overnight rise can only improve the flavor and texture.
- Sourdough. It's been a long time since I've had a living sourdough starter.6 My last - which was around for over a year - succumbed to some sort of infection, and just couldn't be revived. Since then, I've been wanting to start up another, if for no other reason than its growth developed great flavor, but required long rise times.
- Other yeasts. Okay, so a sourdough starter takes a lot of continuous effort, especially if you want to develop the real sourdough flavor. (It takes weeks, even months.) But I'm intrigued to try other, unusual sources of yeast. Possibilities include: kräusen, the yeast foam that gets left behind when racking beer between containers; the living yeast inside a bottle of unfiltered, bottle-conditioned beer; or even unwashed organic grapes. I'm particularly interested to see how it comes out with just a bottle of beer as both the liquid and yeast.
* * * * *
1November 8th, 2006. The article, should it be of interest; also, the followup, on December 6th, 2006. And, for kicks, the video.
2The key difference is that I snapped a few photos this time.
3According to Harold McGee's On Food And Cooking, the proteins and fats in the milk interfere with the gluten chain bonding, which results in a more tender loaf.
4Which is just about water.
5Or green tea. I'm thinking of Chinese-style steamed buns.
6We called it "The Bitch", in reference to Adam Real-Last-Name-Unknown in Anthony Bourdain's Kitchen Confidential. People never knew what to make of the note on the refrigerator that screamed, "Feed The Bitch or she'll die!"
2 comments:
yum! your pictures looked so enticing and the recipie sounded so not-time-consuming that we just had to try it! We've got a 7-grain breadflour flour blend, with a 3-seed/sage mix-in for flavor rising tonight. We'll let you know how it turns out! thanks for the tip!
Indeed. It takes so little time and effort that it might actually be easier than going to the store to buy a loaf of bread. Plus, it fills the apartment with the most wonderful aroma as it bakes, especially when you pop the lid.
(Also neat: when you set it on a rack to cool, listen for the cracking and popping sounds of the crust forming.)
Post a Comment