
It's been some months since I first cobbled together my homemade cold-smoker, and I'm realizing that, despite putting it to good use on several occasions, I've never taken the time to explain it in detail. First, the distinction between the two primary forms of smoking food:
- Hot-smoking
This means simultaneously cooking and smoking food. In their book, Charcuterie, Michael Ruhlman and Brian Polcyn make an addition distinction of "smoke-roasting", by which they mean smoking at moderate temperatures, around 350°F; when their recipes note "hot-smoking", they mean to use a temperature of approximately 200°F. In essence, the result is the same, with the cooking temperature determining the length of time that the the food stays in contact with the smoke.
The options for hot-smokers are pretty wide-open. I tend to rely on my charcoal grill, which is about as simple and straightforward as it can be. A large roasting pan or wok, with a tight-fitting lid - and a pretty serious exhaust system - could do the trick inside the kitchen. For gadget-lovers, there's always the Bradley Smoker, which has temperature controls, several racks to handle large quantities at one time, and several different sizes and options to choose from. Then again, the standard model's $350, plus shipping, and you need the space to put a refrigerator-sized smokebox.
Oh, and it requires the manufacturer's hockey-puck-looking1 "bisquettes" as smoking material. Sure, they're available in a variety of hardwoods, but that's still awkward and limiting. - Cold-smoking
This means smoking food without cooking it, which requires temperatures below 100°F - preferably in the 60° to 80°F range. It's not easy to do. Creating smoke takes a lot of heat, and you need to dissipate that while still getting the smoke where you want it.
The Bradley folks claim that their machines can do this2, but Ruhlman and Polcyn found it difficult to do. They had to place a pan full of ice between the smokebox and the food, and that takes a fair bit of maintenance effort over time. Still, they note that "professional smokehouses that include some sort of refrigeration device and do all the work for you cost as much as a car."
What other options does the home cook have? The authors note that Bruce Aidells, a San Francisco sausage maker, has a method of placing a few burning coals into a pie pan full of sawdust, then setting it in a covered grill. It's really labor-intensive, requiring regular replacement of the coals as they burn out, but sounds like it works well.
Or you can just build your own setup.
The biggest part of my decision to do this was to save money, but there are a few other aspects of the homemade system that have been bonuses. Ease of modification is one; the ability to use a full range of smokable materials is another. When I have the time for a more permanent setup, there are some modifications I plan to make to this design, but I'm quite happy with it for now.
In essence, the smoker is a two-box setup. Smoke is produced in one box, and fed to another, unheated box containing the food. Below is a schematic diagram, as it currently exists. (Click on the picture for a larger version.)
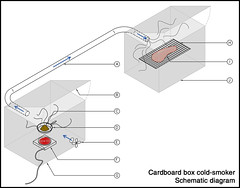
Key:
- This is the connector between the two smoker boxes. I've used some 4-inch, flexible, aluminum dryer vent ducting, which is good for two things: I can set up the two smoker boxes wherever I want3; and I can compress or extend the duct to adjust the amount of exposed surface area - and hence heat loss - the smoke has before it reaches the food. It hooks to the smoker boxes via some 4-inch duct adapters, so the duct can be removed and collapsed inside its box when it's not in use.
- The tops of the boxes open. (There's nothing on the bottom, and hence nothing to contact the heating element or to be dripped on.) I'd toyed with the idea of side doors, to limit the amount of smoke lost while checking on things, but they required laying on the ground to use, and smoke pours out of every possible crack, anyhow. As long as you remember to keep your face back while the first puff of smoke pours out, the operable lid's the way to go.
- Wood. I've used hardwood chips, hardwood sawdust, and hickory nut shells. I've heard of people using fist-sized chunks of fruitwood. Other possibilities include coffee beans, herb branches (such as rosemary), hops and tea leaves. If it smells good, and you think it'll make food taste good, it'll probably work. A major exception are softwoods, such as pine. The resins in softwoods produce a foul smoke that'll make the food taste like tar.
To minimize the need for significant cleanup, I wrap the stuff-to-be-burned in a layer of aluminum foil, seal it tightly and puncture the top about a dozen times with a pencil tip. I find that 1-½ cups of stuff will give me about half an hour of smoke, and that two of those packets will fit side by side an 8-inch cast iron skillet, so that one can finish up as the next one warms up. - A cast iron skillet. The indispensable, indestructible kitchen tool. Also: cheap at your neighborhood hardware store. Here, it functions as a barrier between the heating element and the wood to be smoked.
- The intake fan. I've built a cardboard funnel that attaches to the front of a cheap, square 120V fan to push air into the smoker box. By keeping the intake and exit openings from aligning, the low-volume displacement pushes smoky air from the smoking chamber to the food chamber.
- A hot plate. Though this has an adjustable temperature control, it remains at full for the length of the smoking process. It's just a simple electric cooking element that plugs into the same power source as the intake fan. Note that the box is significantly larger than the fan to keep things from unexpectedly igniting.4
- The smoker box. Hot smoke is produced in here, far away from the food. It's a cardboard box, roughly 18"x18"x24", assembled with duct tape.5 In order to keep it from being blown about by any sudden gusts of wind, I place a concrete block tight up against it on two opposite sides. My current design is not collapsible, which is a worthwhile consideration for future versions.
- A cooling rack. In order to get the most smoke on the food, it needs to have as much airflow around it as possible. To keep it simple, I use an old cooling rack propped up on some ramekins.
- The food. Whatever it is, it just sits there. As long as it's safe to leave in a warm, low-oxygen environment for several hours, you could use pretty much anything you like.
- The food box. It's a lot like the smoker box, except with only the smoke intake opening. Technically, I suppose you need to provide some ventilation to allow some smoke to escape, but there are enough open seams to accomplish that. When the duct is fully extended, the interior of this box lingers at just about ambient temperature.
The most recent use of the smoker was to create my own bacon6, flavored with maple syrup, brown sugar, and lots of smoke. I used hickory nut shells for four hours, which gives it a very intense woodsmoke flavor that softens as it cooks. There's a definite difference between this and, say, an applewood bacon, and I'm more inclined to use less to keep the flavors in a dish balanced. That said, a few slices are great with eggs and toast.
I still haven't smoked fish, salmon or otherwise, which I'd thought would be one of the first things in the box. Also on the to-smoke list: scallops or shrimp; fresh ricotta or another fresh cheese; pork and other fresh sausages; cured duck or chicken breast; and whatever else seems like it'd taste good. Someday, maybe I'll even try cold-smoking some pale malt for a homemade rauchbier.
* * * * *
1They're Canadian.
2Subject to ambient temperature, but you can't hold that against them.
3Such as out of the direct sun, which is a necessity in the summer.
4As with grilling, a handy fire extinguisher is always a sensible idea, as are a pair of large, heat-resistant gloves.
5Duct tape is unreliable, from an adhesive standpoint, so I'd caution against using this unless no other options are available. Know what duct tape is good for? Removing warts. I'm completely serious.
6Nearly five pounds of it, which is in addition to an equal amount of pancetta. That's a lot of cured pork belly, no matter how you look at it.
No comments:
Post a Comment