31 August 2007

Tomato de Bergerac.

Lewisburg.

I picked a tomato the other day, and I'm quite sure it's the oddest one I've ever seen. Add a pair of little plastic eyes, and it'd belong in a Joost Elffers book.

Striped Cavern

It might be a nose. Sharon insists it's flipping her the bird. I'm sure the imagination delights in finding anatomical correlations.

Incidentally, the variety is called Striped Cavern. They're a great stuffing tomato, being virtually empty - at least a third air space before coring and deseeding - inside; the flesh is sturdy, too, and holds up quite well in the oven. The flavor's nothing special, so I wouldn't include it in a Caprese salad, but they're still leagues better than any picked-unripe grocery store tomato.

19 August 2007

Homemade bagels and goat cheese.

Lewisburg.

Living in a small town has its pleasures: calm, quiet evenings; an absolute dearth of traffic; a small enough population base that you regularly recognize folks around town in almost no time at all. Trying to find, say, good Thai food is where you begin to realize that this may be an occasional problem. Unless you're the sort of person who thinks eating pizza with pepperoni is adventurous, the dining options in small-town America are bound to become a source of frustration at some point.

Thai food - as well as Indian, Chinese, Mexican, Caribbean and Japanese cuisines, among others - is on the list of things I need to learn to cook. Of course it would be. Finding good ingredients becomes a challenge, but it can be done. Learning new techniques and honing those skills creates a goal worth aiming for. We knew this would be the case before we moved.

Then there are those things that we'd more or less taken for granted, by which I mean bagels. There are others, and we'll certainly find those in due time, but knowing that it's a twenty-mile drive to the nearest mediocre bagels is disheartening. So I might as well add bagels to the learn-to-make list.

Bagels

And it turns out that they're fairly easy, especially with a standing mixer handy. I made the first batch with molasses - lending the bagels a rich, brown color and good molasses flavor - and topped some with sesame seeds, some with chive seeds, some with salt and a few not at all. The recipe is slightly modified from the one in Mark Bittman's How To Cook Everything to use the standing mixer, rather than the food processor.
Bagels
Makes eight to twelve

Ingredients
  • 3½ cups bread flour
  • 2 teaspoons kosher salt
  • 1 teaspoon instant yeast (Note: use less yeast to effect a longer rise, which will give a better flavor)
  • 2 tablespoons sweetener: molasses, honey, maple syrup, sugar, etc.
  • 1¼ cups water
  • Sesame seeds, poppy seeds, etc. for toppings (optional)
Directions
  1. Using the stand mixer's paddle attachment, mix together the flour, salt and yeast until well combined. Add the sweetener and mix for thirty seconds.

  2. With the mixer running, pour in the water. Mix until everything comes together into a mass of dough.

  3. Switch to the dough hook and knead for five to ten minutes, until the dough has become smooth and very elastic. Knead briefly on a lightly floured board, and form into a ball. Return the dough to the bowl, cover in plastic, and allow to rise at room temperature for about two hours, or until doubled in size.

  4. Deflate the dough ball on a lightly floured board, and allow to rest, covered, for ten minutes. Cut into eight to twelve equal pieces, and knead and roll each into a smooth ball. Pinch a hole through the center of each and stretch out, gently, into a bagel shape. Allow these to rest, covered, for thirty minutes.

  5. Preheat the oven to 400°F and bring a large pot of water to a boil. Being careful not to crowd them, drop the bagels into the boiling water. Work in batches as necessary. Boil for one minute on each side, then remove with a slotted spoon and allow to drain on a rack.

  6. Place the drained bagels on a (greased if necessary) baking sheet. If adding toppings, brush or spray the tops lightly with water and sprinkle toppings on as thickly as desired. Spray the oven with water to create steam and place the bagels inside. Bake for five minutes, spray with water again, and continue baking for another twenty to twenty-five minutes.

  7. Cool on a rack. For a shinier crust, spray the bagels lightly with water as soon as you remove them from the oven.
They're crispy-skinned bagels, densely chewy and leagues better than the typical pillowy-soft bagels out of the grocery store. I'd suppose that you could vary them in nearly as many ways as you would bread, though anything that limits the effectiveness of the gluten network deserves a careful approach. An overnight rise; milk instead of water; onions or raisins or cheese kneaded into the dough; all of these would, I suspect, make great bagels.

And, for those who insist on spreading cream cheese all over a perfectly good toasted bagel - I prefer good butter - I'd recommend considering a good, fresh, homemade goat cheese instead. It's remarkably easy to make, assuming you have access to good milk, and hardly takes any active effort. I stumbled across a recipe for fresh neufchâtel that takes just a tad more work than the fresh ricotta recipe I've been making from time to time. It's more cheese-flavored than milk-flavored - more acidic tang, a little less sweet - and takes more planning, but it's well worth the effort.

Fresh neufchâtel

I followed Fankhauser's recipe as closely as possible, so it's not worth repeating the recipe here. After salting the cheese, I used a muffin pan, lined with plastic wrap, as a mold. After allowing the cheeses a little time to firm up in the refrigerator, I sprinkled them with some herbes de Provence1 from Penzey's Spices, but that's about it.

Spread it on toast or crackers; have it with some of the season's ripe heirloom tomatoes.

* * * * *

1Rosemary, cracked fennel, thyme, savory, basil, tarragon, dill weed, oregano, lavender, chervil, and marjoram.

14 August 2007

Sourdough and sausages.

Lewisburg.

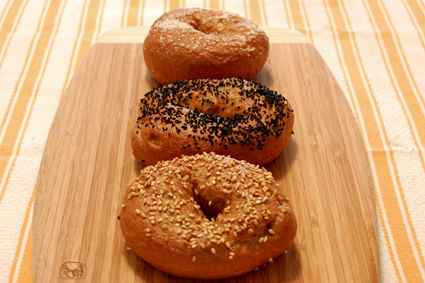
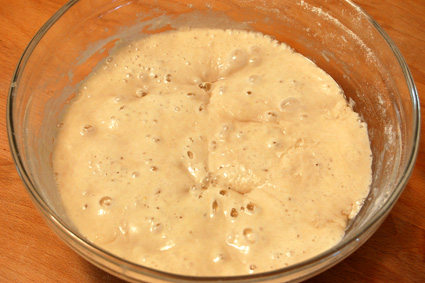
Less than a week in, the sourdough starter has taken up residency in the refrigerator; twice-daily feedings quickly outstrip all but the most ambitious baking schedules. Even in the past week I've baked two loaves of bread and made a big batch of pancakes. Two people just can't eat that much. Even when it looks this fine:

Sourdough loaf

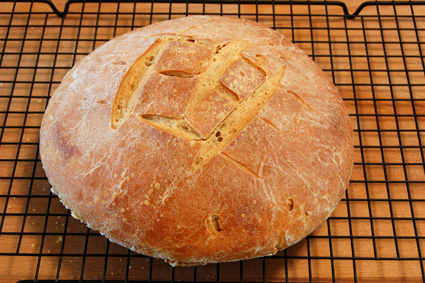
The crumb's dense, soft and chewy; the taste is intensely sourdough. It's great simply toasted (or not) and spread with butter. But it takes more attention and effort than I'd like to give it: a wet, near-batter dough sits overnight; in the morning, it requires kneading with additional flour; after several hours of proofing, it's time to shape, followed by several more hours of proofing before it's ready to bake. I'd originally tried it using the no-knead recipe, but that only yielded an uninflated, gluten-free mass of dough. The sourdough, it seems, prevents that lazy method of gluten formation that I've become such a fan of.

This wasn't such an issue with sourdough pancakes, however. Normally a pancake recipe that's allowed an overnight rest to develop bubbles from instant yeast, I'd decided to give it a shot with the sourdough starter. There was no recipe to follow for this one, so I just had to wing it.

Pro: They were pancakes with real sourdough flavor.

Con: They weren't so much pancakes as crepes.

The difficulty, it seems, is that sourdough just doesn't produce the same vigorous bubbling that commercially available yeasts do. So, when the yeasts were supposed to metabolize the available sugars faster and faster as the pancakes cooked on the griddle, they just weren't up to the task. Hence the sourdough crepes. Sourdough blueberry crepes, actually, which was definitely messier than expected, but worth the cleanup.1

And, speaking of irritating kitchen cleanups, I've also finished my first batches of sausage since moving to Pennsylvania. Nothing quite like a sinkful of bowls, grinders, and other items crusted with bits of raw meat to make one wonder if the effort's really worth it.2

The first sausage, at Sharon's request, was another batch of the "chicken marsala" sausage that had been such a hit before. It's chicken, with sauteed shiitake mushrooms, roasted garlic, onions and marsala wine, loaded with enough fat to keep it all moist through the cooking. It's great with some relatively simple starches - fresh egg pasta or spätzle would be a fine choice - and whatever green vegetables are in season. Though, as an accompaniment, it's hard to go wrong with some garlicky spinach, just barely wilted.

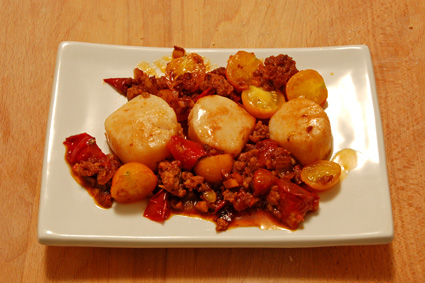
The other sausage, since I had some extra meat, was a chicken variation on Mexican chorizo. It's normal to have it loose, rather than stuffed in casings, and I couldn't complain about not having to clean the sausage stuffer twice. A pair of leg quarters from an older bird - hence liberally studded with fat - plus salt and a range of spices, run through the grinder and moistened with a little tequila and vinegar. It's the sort of sausage I could make on a whim one night.

Toss it in a hot pan with onions and garlic, sear up a few scallops, and add some chopped tomato until just barely softened, and you're ninety percent of the way to a great dinner.

Scallops and chorizo

Assuming you don't have a meat grinder, or that it's too much effort to use it and clean it, here's a version using ground meat. Turkey or pork would work equally well, though in all cases it's best to get the fattiest ground meat available. Good sausage is about 30% fat, which not only adds a lot of flavor, but also contributes enough moisture to keep the meat from seeming dry and rubbery if overcooked.
Mexican-style chicken chorizo
Makes approximately one pound of loose sausage

Ingredients
  • One pound ground chicken, or ground chicken with added pork fat (30% fat is ideal)
  • 8 grams kosher salt, or slightly more than half a tablespoon
  • ½ tablespoon ancho chilli powder
  • ½ teaspoon paprika
  • ½ teaspoon chipotle chilli powder
  • ¼ teaspoon ground black pepper
  • ¼ teaspoon dried oregano (or ½ teaspoon fresh)
  • 1/8 teaspoon cumin
  • ½ tablespoon tequila
  • ½ tablespoon cider vinegar
Directions
  1. In a bowl, mix together the meat and spices for about a minute, until thoroughly combined. Add the tequila and cider vinegar, stirring until completely absorbed.

  2. If desired, cook up a small piece to check the seasonings, and adjust as necessary. Store in the refrigerator and use within a few days or store in the freezer, tightly wrapped in plastic.
* * * * *

1This stands in stark contrast to the one and only time I made blueberry waffles. Delicious, yes, but cleaning caramelized blueberry out of the waffle iron is one of the least enjoyable kitchen tasks I've ever undertaken.

2It is. I wonder the same thing after every batch of homebrew, but it always is.

08 August 2007

The Bitch is back.

Lewisburg.

In this case, I'm referring to the latest sourdough starter,1 not the Elton John song. Though that episode of This American Life where Starlee Kine and Jon Langford assemble a band from the classified ads to play "Rocketman" is pretty sweet. But I digress.

This is my second attempt at a sourdough starter, a few years after the last one succumbed to what I suspect was a bacterial infection. Regular time at home - necessary for the frequent feedings and baking a starter requires - had been in short supply from then until now. So far, so good, as you can see:

Sourdough starter

The summer heat, it seems, is moving the process along briskly. This may present some problems, especially over the long term, but I'll just have to wait and see. A sourdough starter is essentially a living colony of wild yeasts and bacteria - usually lactic acid bacteria, hence the "sour" quality - that offers a handful of pros and cons in bread baking. Some sourdough facts gleaned from Harold McGee's On Food And Cooking:
  • The bacteria help delay staling, and the acids help prevent spoilage.

  • The more acidic conditions of the dough reduce Maillard browning reactions, resulting in a lighter-colored loaf.

  • Sourdoughs don't rise well; the bacterial populations outnumber the yeasts by several orders of magnitude, inhibiting gas production. In addition, the acids and protein-digesting enzymes weaken the dough's gluten network.

  • Starters require frequent feedings, since microbes consume nutrients rapidly, and refreshing the starter dilutes the buildup of acids and other growth-inhibiting substances. Twice a day is the standard, though some starters may require more than that. Liquid starters, in which the microbes have easier access to nutrients, require more frequent attention than more solid starters.

  • Starters work best for breadmaking when they're at their most active, bubbling away.

  • Temperature control is important. Yeasts thrive best at 68-78°F; bacteria at 86-96°F. Thus, starters and rising doughs work best when kept relatively cool.

  • Salt's a good thing. It limits the effects of the protein-digesting enzymes from the starter's bacteria, and helps tighten the gluten network.
With that in mind - though limited by the fact that I have no control over temperatures in the house2 - I've modified the (previously successful) recipe for a wild yeast starter from Joy. The only real modification I've made is to include salt, guessing that the same proportion I use for bread ought to work well; a teaspoon salt per cup flour doesn't seem to inhibit yeast growth. Joy also mentions that some starters are made with fresh or dried hops - originally used in beer brewing to retard bacterial spoilage - but, as I don't have any handy right now, they'll have to be part of a future batch.
Wild Yeast Sourdough Starter

Ingredients
  • Bread flour
  • Salt
  • Water
Directions
  1. In a very clean, small mixing bowl, mix together ½ cup bread flour, ¼ cup room-temperature water, and ½ teaspoon salt. Stir together until you start to see signs of gluten formation - the development of stringiness and elasticity. Cover tightly with plastic wrap, and use the tip of a sharp knife to poke half a dozen holes in the plastic. Let stand at room temperature, away from drafts, for 12 hours.

  2. Mix another ½ cup bread flour, ¼ cup room-temperature water, and ½ teaspoon salt into the starter. Re-cover the bowl and let stand another 12 hours.

  3. Transfer the starter to a clean bowl, and stir in another feeding (½ cup bread flour, ¼ cup room-temperature water, and ½ teaspoon salt). Re-cover and let stand another twelve hours. If, by this point, the starter has not risen and started bubbling, discard and start over.

  4. Stir in another feeding, and cover the bowl with new plastic, without holes. Continue feeding, every 12 hours, for another day. The starter should have a slight sour aroma, and is best used when at its bubbliest, about halfway between feedings. If twice-daily feedings result in more starter than you can use, refrigerate and feed weekly.
I'll try to post more as the sourdough-making process continues. Provided, of course, that I remember to feed The Bitch, or she'll die.

* * * * *

1As I'd noted before, the name comes from Anthony Bourdain's Kitchen Confidential, and will, before long, result in a kitchen sign reading, "Feed The Bitch or she'll die!"

2No air conditioning. And the rather small basement keeps nice and toasty due to the oil furnace that provides us with hot water and, come wintertime, heat throughout the house. So, unless I come across an inexpensive secondhand refrigerator that I can override with a controllable thermostat, the starter'll just have to deal with ambient air temperatures. Unfortunately, the same limitations apply to homebrewing, which is decidedly less forgiving than bread baking - and which is all the more reason to keep my eyes open for a spare fridge.

02 August 2007

Blueberry-peach jam.

Lewisburg.

We have - at long last - a fully-functioning kitchen. Or as close as we're going to get.

New kitchen

With shelves - so that we're no longer digging spices out of boxes and bubble wrap - and counter space - so that cooking needn't be intensely choreographed - we can finally make food like we're used to. Like yesterday's foray into jam-making.

We missed the boat for strawberry jam; it wasn't possible before we moved, which coincided with the end of the season anyway. So far, we haven't had much luck finding orchards that offer pick-you-own - one for sour cherries; another for blueberries - so our options are rather limited. Facing the prospect of no homemade jam, for ourselves or for holiday gifts, we decided to see what we could do with blueberries.

My mom had suggested blueberry-peach jam, which she'd made years ago, long before she gave us her old canning equipment. So, armed with ten quarts1 of handpicked blueberries and a big basket of peach "seconds", we went to work.

Sharon found a recipe for a spiced blueberry-peach jam from the "National Center for Home Food Preservation" online, which seemed as good a place to start as any. We didn't mess with it too much, except to change the spices: keep the cinnamon, but swap out the cloves and allspice for star anise and lavender. That, and to double the recipe, which produced well more than twice their estimated yield.

This seems to happen to me with some regularity. I always end up with more jam than the recipe thinks I might. This is only a problem when there aren't enough clean jars and I'm busy trying to deal with the spilled jam that's managed to catch fire beneath the electric burner, licking flames up the sides of the pot. It certainly added a little excitement to the day.

But the result was a definite success, coupled with a fair amount of cleaning:

Blueberry-peach jam

Blueberry-peach jam with star anise and lavender
Makes about 4 pints

Ingredients
  • 4 cups blueberries
  • 4 cups peaches, chopped
  • 2 tablespoons lemon juice
  • ½ cup water
  • 5½ cups sugar
  • ½ teaspoon salt
  • 1 3-inch stick cinnamon
  • 4 points star anise
  • ½ tablespoon dried lavender
Directions
  1. Place the water in a small saucepan with the cinnamon and star anise. Bring just to a boil, then cover and remove from the heat. Allow to steep at least thirty minutes before removing the spices.

  2. Place the spice-infused water, fruit, and lemon juice to a large pot and bring to a boil. Boil for ten minutes., stirring occasionally.

  3. Add the salt, sugar, and lavender, stirring to dissolve. Bring back to the boil, and stir constantly until the jam thickens. Remove from the heat.

  4. If canning into pint or half-pint jars, leave ¼-inch headspace and process in a boiling water bath for 10 minutes. Alternately, refrigerate and use immediately.
Just try not to eat it all in one sitting.

Edit: I've revised the quantities of spices in the jam; I'd originally listed them as I'd measured for the doubled recipe.

* * * * *

1Not that all of those were ever destined for jam. There are two pies' worth in the freezer, as well as a bunch of small bags set to go for pancakes, muffins, or whatever sounds good. Then there's the pandowdy recipe that looks good - something like a cobbler - and blueberry pancakes planned for brunch on Sunday.